If you're thinking about self-hosting and haven't seen our write-up on the pros and cons, you should take a minute to check that out and then come back to learn about how to install a Type 1 hypervisor to start your journey.
What is a Hypervisor?
At its core, a Hypervisor is simply an application that lets you run other computers on it. It abstracts the hardware of the host computer so that it can all be shared with each virtual machine that's running on it simultaneously. We touched upon this topic a few years ago in the guide that discusses how to build a virtual browsing environment.
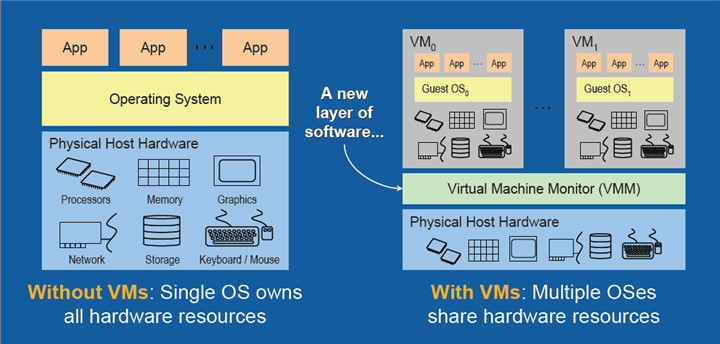
There are two types of hypervisors, Type 1 and Type 2. The main difference between the two is that a Type 1 hypervisor is installed directly on the hardware, whereas a Type 2 hypervisor is software that runs on another operating system. In our virtual browsing article, we used a Type 2 hypervisor, VirtualBox, running on Windows. In this guide, we're going to install Proxmox Virtual Environment, a Type 1 hypervisor, that runs directly on the server hardware itself.
Pre-requisites
For the sake of this guide, we're assuming that you have the following:
- A spare computer to install Proxmox on. A mini PC works great here, especially when you're just starting out
- A USB thumb drive with at least 1 GB of space
Download the Tools
We'll need to download two tools: The Proxmox ISO itself, and a tool to create a bootable USB drive. For the purposes of this guide, we're using Balena Etcher, but if you're more comfortable with a different tool, feel free to use it.

Start by going to the Proxmox website, click the Downloads button, and download the most recent version of the Proxmox ISO Installer (8.1 at the time of this writing).

Next, go to the Balena website, click Download Etcher, and then select the proper file to download. If you're going to use this on a PC, you have an option of downloading a version that will install the program on your system (Installer) or a version that can be run without installing first (Portable), useful if you don't have admin rights on the machine or if you aren't going to use this tool more than once.
Create the Bootable USB drive
The first step will be to create a bootable USB drive, so insert the USB drive into an open port on your PC (not the server you're going to be using!).
Gallery: Balena Etcher Install Screenshots


- Start Etcher.
- Click on "Flash from file" and select the Proxmox ISO you downloaded.
- Click on "Select target" and select the USB drive you want to use. Be careful as this will destroy all of the contents on the device, so don't accidentally pick the wrong drive!
- Finally, click the "Flash!" button to start. This process won't take too long, and when you're done, you can remove the USB drive.
Install Proxmox on the Server
The process to install Proxmox is very straight forward, but there are a few things you'll need to make sure of during the process.
Before starting the installation, ensure that virtualization is enabled within your server's BIOS. The process is different depending on the motherboard, but generally consists of:
- Press a key to get into the BIOS (e.g.: Esc, F1, F12, etc)
- Find the CPU setting (e.g.: Processor, Chipset, or Northbridge)
- Enable the virtualization parameter (e.g.: VT-x, AMD-V, SVM, or Vanderpool)
- Enable Intel VT-d or AMD IOMMU if those options are available
While you're in the BIOS, make sure that the system will boot off of USB; you can reduce the USB priority later if you want to.
Then just follow the below ten steps to complete the installation. The gallery shows what each screen looks like along the way. Note that the installation was initially done on VirtualBox to make screenshots easier, and is something you can play with first to get the hang of the process.
Gallery: Proxmox Initial Installation


- After saving the virtualization settings, insert the USB drive you created in the last step into the server you want to install Proxmox on. Note that this is installing an entire operating system, so will wipe all of the data on the drive of the system.
- Reboot the server you're using so that it will boot off of the USB device you inserted.
- The first window asks if you want to install Proxmox with a graphical or terminal UI. Since this is a server and you'll manage everything through the web browser (and occasionally SSH), you want to save resources and install only the terminal interface.
- Next, the installer will check to make sure you enabled virtualization and will give you a warning if you haven't. If you don't see the message, and instead only see the EULA, you're good to go. So read through the entire EULA (I'll wait...) and, if you agree with it, select I agree at the bottom to continue.
- Next up, select the hard drive where you'll install Proxmox. In most instances, you'll probably only have one choice.
- The next step is to setup the country, timezone, and keyboard layout. Don't just blindly click next because in my experience, the system frequently picks... odd... defaults. In the screenshot, you can see that I was presented with Austria as my country and German as the keyboard layout. I missed this the first time, and was confused on the next screen when pressing shift-2 gave me quotation marks like on my old Commodore 64!
- After selecting the location information, you'll be asked to create a root password. This is the password you'll use to login to the web GUI as well as the command line, if needed, so even though passwords aren't the best thing to use, make sure you select a secure one.
- The other thing to consider on this screen is what email address you want to use for communication. If you aren't setting up SMTP, it probably doesn't matter what you use here, but the system requires a correctly formatted address.
- The next screen asks you to select a hostname and an IP address for the server. You cannot use DHCP with Proxmox, nor should you for servers in general, so pick an IP address that isn't part of your DHCP reservation pool and that you can remember going forward. We'll look at adding this to a local DNS service like Pi-hole in the future. You'll also want to set the gateway (how does it leave your network), as well as a local (or remote) DNS server.
- Now you review your settings, click the install button, and wait a few minutes for your hypervisor to be installed.
- Finally, remove the USB drive, reboot, and you'll be presented with the root login page.
First Login
When the installation is complete, you'll be presented with a login on the monitor connected to the server, but you'll rarely if ever need to use that. Instead, take note of the URL on the login page and type that into your favorite web browser.
Dark Mode
The first thing I like to do is setup dark mode in the interface to make it easier to read.
Gallery: Proxmox Dark Mode Setup


- Put the URL in the browser and you're greeted with the login screen.
- The username is root, and the password is whatever you selected during the installation.
- Click "Ok" on the "No valid subscription" alert. We'll cover that in a minute.
- In the upper-right hand corner, click on "root@pam" to get the dropdown menu.
- Select "Color Theme."
- In the dropdown, select "Proxmox Dark" and click Ok.
- Your screen will now be easier to read!
Enterprise Repository
As noted in the Dark Mode section, unless you want to pay for support, you aren't allowed to download from the Enterprise repositories. The main difference between the Community and Enterprise repos are that the latter are more stable. For a home environment, you won't notice a difference. However, unless you setup community updates, your Proxmox installation will never be updated, so let's set that up here.
Gallery: Proxmox Repo Configuration


- Click on the name of your node under Datacenter (in my case, it's "proxmox1").
- Click on "Repositories" under "Updates."
- Click on the "https://enterprise.proxmox.com/debian/ceph-quincy" repo and then select "disable."
- Click on the "https://enterprise.proxmox.com/debian/pve" repo and then select "disable."
- You're now given a warning that you will not receive any updates, so click on "http://download.proxmox.com/debian/pve" and then click "enable."
- You will see a message that says "no-subscription repository is not recommend for production use," but above it, there should be a green checkmark confirming you're receiving updates for Proxmox VE.
- Now click on "Updates," right above "Repositories."
- At the top, click the ">_ Upgrade" button.
- If there are updates, type "y" to proceed, and then wait for it to finish.
Conclusion and Next Steps
You now have your very own Type 1 hypervisor setup, configured, and ready to create virtual machines, which we'll tackle in the next installment. In addition, we'll take a high level look at the different options within the GUI interface and where some settings are that you might not otherwise think of.
You can read all of the articles in the series by searching for the 'selfhosting-guide' tag.
If you have anything specific you'd like us to cover in a future self-hosting guide, let us know in the comments.


5 Comments - Add comment