Coke vs. Pepsi. Android vs. IOS. Windows vs Mac. Although one isn't necessarily better than the other, fans of various brands constantly defend what they perceive as the "better" choice in all of these battles. The world of network attached storage (NAS) is no different: Synology vs. QNAP (and to a lesser extent, Thecus).
Today I'm taking a look at the QNAP TS-451+, a four-bay NAS device that acts not only as a centralized storage service for your home, but also has multimedia functions, can connect to a display via HDMI, and has an included remote control. This is an update to the previously reviewed TS-451.
Specifications
Powering the QNAP TS-451+ is an Intel Celeron 2.0 GHz quad-core processor. By default, the device has 2GB of DDR3L RAM but with two SODIMM memory slots, you can easily upgrade the device with up to 8GB of memory.
There are four drive bays, supporting a maximum of 32TB of storage if using four 3.5" 8TB drives. However the device supports both the UX-500P and the UX-800P, giving you the ability to chain an extra five or eight disks to this unit.
| CPU | Quad-core Intel Celeron 2.0GHz (burst up to 2.42GHz) |
| Memory | 2GB DDR3L standard; user upgradeable to 8GB |
| Disk Capacity | 32TB (4x8TB drives in JBOD) (Hot Swappable) |
| Network | 2xGigabit Ethernet |
| USB Ports | 2xUSB 2.0 (back), 1xUSB 3.0 (back), 1xUSB 3.0 (front) |
| Size (H/W/D) | 6.97x7.09x9.25 inches (177x180x235 mm) |
| Weight | 3 kg (6.61 lbs) |
The TS-451+ has two Gigabit Ethernet ports on the back, as well as two USB 2.0 ports and a single USB 3.0 port. There's also an integrated HDMI port and a Kensington lock.
The front of the storage device has another USB 3.0 port which supports external storage or even things like USB printers if you're so inclined. In addition, there are several LED lights letting users know the status of the LAN, each drive bay, and the USB port. Rounding out the front of the box is a power button and a "copy to USB" button.
Hardware Installation
One of the reasons you purchase a NAS device instead of building your own server lies in the fact that it's easier to get up and running, and QNAP doesn't disappoint here. Setting up the TS-451+ is completely straight forward: Simply plug in your hard drives, connect an Ethernet cable to one of the NICs, give the box power, and push the "on" button.
Unfortunately, unlike the Synology DS716 (and other Synology devices), the TS-451+ requires you to use a screwdriver to connect the drives into place. In 2016, there's really no reason that every NAS manufacturer shouldn't be supporting toolless installations.
The only other configuration option you have is the ability to install extra memory modules into the TS-451+. As noted earlier, our review device came pre-installed with a single 2GB RAM module.
Configuration
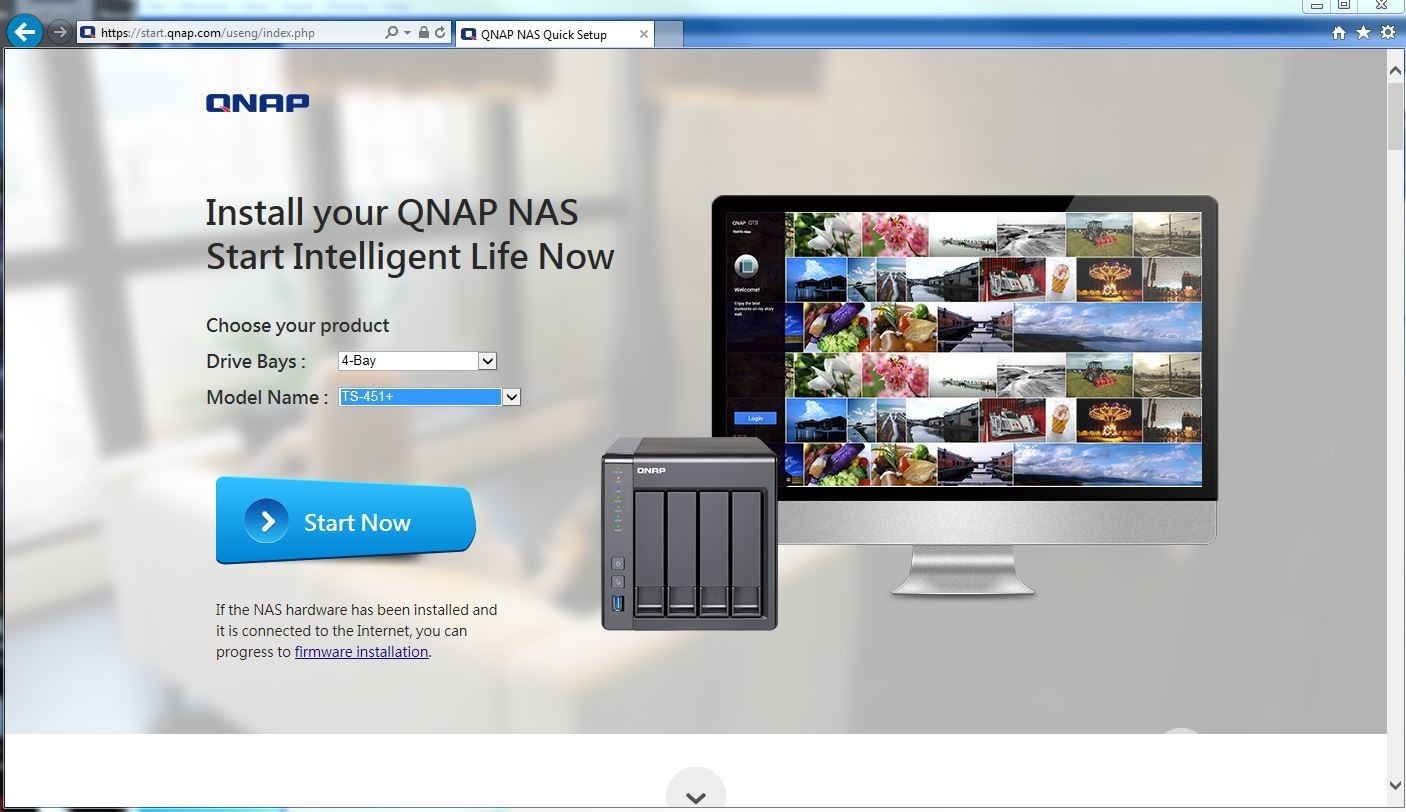
Initial setup and configuration of the TS-451+ is extremely easy, as you're guided through the setup process. After the device is on your network, simply point your web browser at the QNAP start URL and it begins the guided install, beginning with selecting the model of the device.

After traversing a couple of default screens that describe the setup process, including how to install the hard drives, you're prompted to enter the QNAP Cloud Key. This key can either be manually entered, or scanned with a QR code reader which is used to identify your device.

After this, you're requested to create a "myQNAPcloud" account which is used to access your files from the Internet, making the QNAP TS-451+ a "personal cloud." This is optional, but a handy feature to have.
The next message lays out the process, showing each step along the way: Name/Password, Date/Time, Network, Services, Disk, and finally the summary where you commit all of the changes. The first four steps are fairly self-evident: You'll set up the device name and the default admin password, set up the time zone and NTP server, then configure the IP address, DNS servers, and gateway for the NAS.

After setting up the network configuration, you're presented with a list of services the TS-451+ will provide for you. By default the NAS device shares filesystems as Windows drives using SMB/CIFS, but you can easily select to share to Mac via AFP and Linux via NFS if you so choose. This is also where you will set up what default services to allow, and by default all six are checked: Photo Station, Music Station, iTunes Server, a DLNA Media Server, Download Station (aka: BitTorrent), and Video Station.

Next up is the heart of the device: setting up storage requirements. For basic installs, users can select a static volume which will pool all of the devices you select and is probably the best for most common households. If you want to get more advanced, you can create thick or thin volumes which allow for multiple volumes, allow you to over-commit storage, and also let the user configure snapshots. Unless you're an advanced user, you should probably use the static volume, as it has the best performance.

After going through this guided setup, simply wait a few minutes for everything to be installed and configured and you'll be on your way.
Performance
So how does the raw input and output compare to previous NAS devices that I've reviewed? In keeping with the standard testing procedures, I once again used OSFMount to create a 4GB RAM disk, and then used the built in Robocopy tool to test throughput between my desktop and the NAS device.

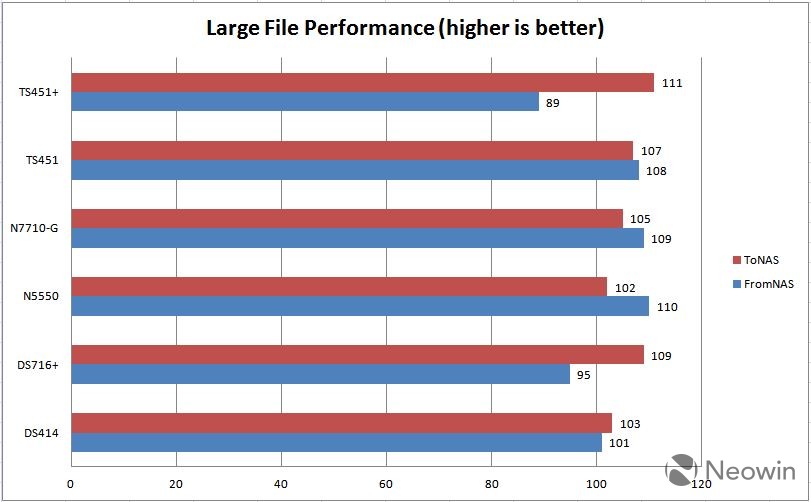
The first test consisted of copying a large 3GB file to and from the TS-451+. Most systems can copy these types of files much faster than the smaller disks due to the lack of having to seek on the disk for the individual file handle. Copying files from my PC to the NAS device provided results that were faster than any device I've reviewed to date (with the exception of the Thecus N7710-G that has a 10 Gigabit Ethernet connector), coming in at 111MBps. What was surprising was that copying files back from the NAS resulted in our worst performance to date, a meager 89 MBps, comparable to the Synology 2-bay DS716+. No matter how much testing I did, I was unable to figure out why the performance was so low, relatively speaking.

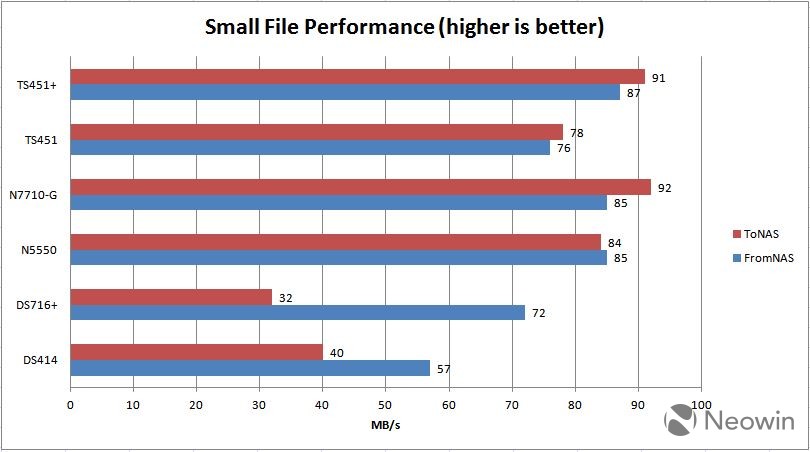
Looking at the performance of small files painted a different picture, with the TS-451+ coming out at or near the top compared to any of its competitors. Copying files from the PC to the TS-451+ gave speeds of 91MBps, second only to the aforementioned N7710-G, while transferring from the NAS to the PC gave a best-in-class speed of 87MBps. I still don't understand why the TS-451+ is the slowest device I've reviewed when copying large files from the NAS, but the fastest when copying small files.
With the exception of the large file mystery, all of the performance tests were higher than the previously reviewed TS-451.
Noise and Temperature
The TS-451+ has a single fan in the back of the device which makes it extremely quiet.

The device also doesn't run very hot. With an ambient temperature of 75F (24C), the CPU was running at 105F (41C) while idle and the hard drives were at 98F (37C), all well within normal operating parameters.
Virtualization and Containers
The TS-451+ supports two forms of virtualization: Normal VMware-like virtual machines and containers, using Docker. The virtualization works just like it did on the TS-451, so I recommend jumping there to learn more about it.

If you're unaware, containers are a virtualization technology that utilizes an isolated environment on top of a host OS, as opposed to running an entire operating system image, and these containers are downloadable from the Internet. The TS-451+ utilizes the Docker Engine and lets you install whatever containers you want. For example, if you wanted a Gitlab source code repository but didn't want to maintain an entire system to do so, you could instead download a container and run it in Docker within the QNAP TS-451+. There are many pre-made containers that you simply click and run, and it works great. Going into the ins-and-outs of this technology is beyond the scope of the review, but if people are interested we may do a deep-dive into containers in a future article. Until then, QNAP has a great document that describes how to get up and running quickly and easily.
Both sets of tools need to be installed separately if you want to run them.
Applications
Although being able to store all of your files and media, as well as run virtual machines and containers is great, the real power of any modern NAS device is in the applications. In this regard, QNAP does not disappoint.
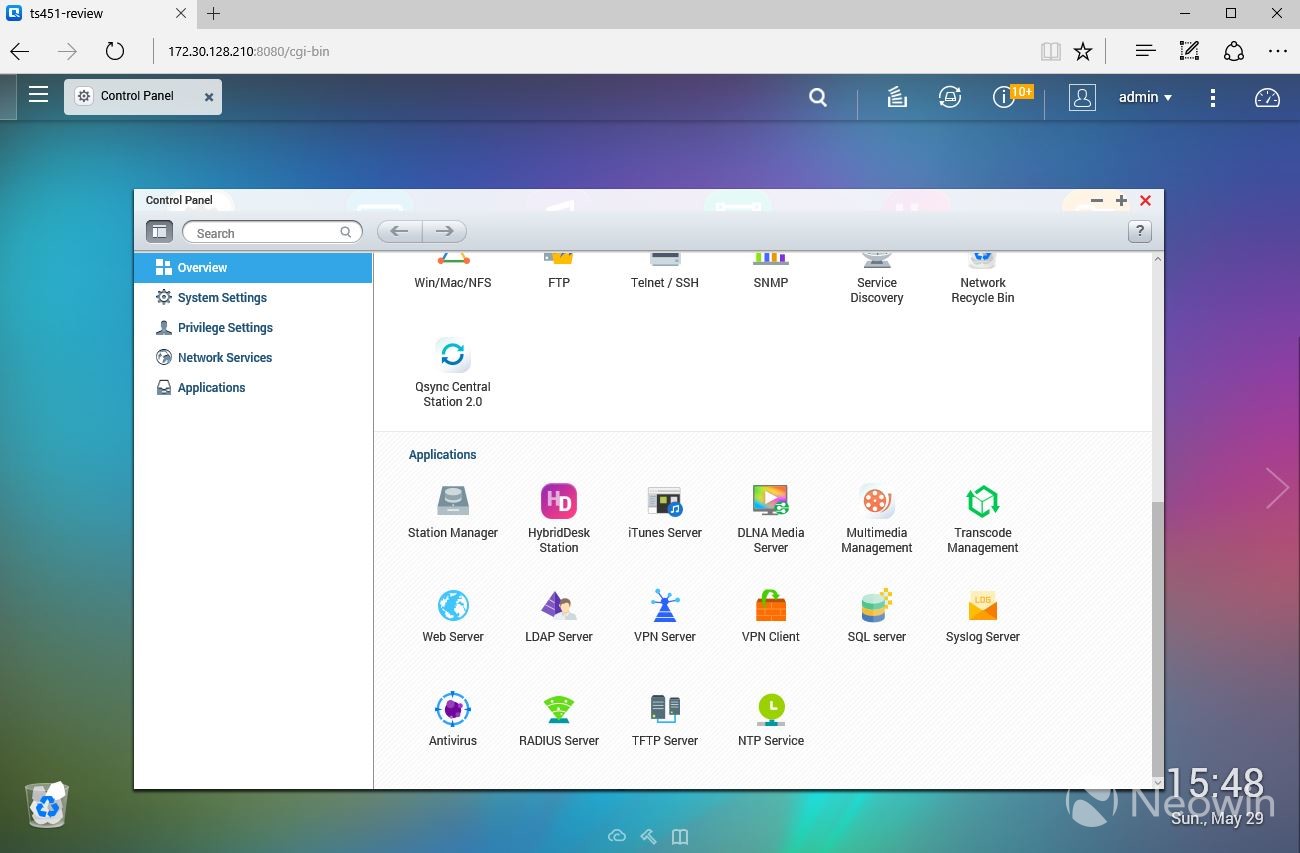
Out of the box, the TS-451+ comes installed with many tools that may be useful on a home or SOHO environment. These include an LDAP server, a web server, an iTunes server, and more. You can also run MariaDB with a few clicks of the mouse if you're so inclined.

If that's not good enough for you, QNAP provides App Center, a tool that lets you easily browse, search, download, and install a plethora of applications onto your TS-451+. Applications are broken up by function, and there's also a "recommended" and "QTS Essentials" section that highlights some of the most popular tools. As noted above, this is where you would download and install the Virtualization Station as well as the Container Station.
Mobile Apps
Just as with Synology, QNAP offers a wide range of mobile apps for your smartphone and tablet that give you the ability to use the media you store on the TS-451+, and unlike when I reviewed the previous QNAP model, the company now has a full suite of Windows Mobile applications as well.
The apps almost all start with the letter Q and it's easy to identify what they each do: Qfile, Qphoto, Qvideo, Qmusic, etc. They're also very easy to navigate through and unlike the Synology applications, there's an easy-to-use Chromecast button in the upper-right hand corner of the display.

There's no native Windows 10 applications available in the Windows Store, but you'll want to download Qfinder before you set your device up. This application searches your local network looking for QNAP devices that are installed, making it easier to connect and configure them.
There's also a program called Qsync that mimics the functionality of tools like Dropbox and Box. Configure the tool to watch a folder on your desktop and it will automatically replicate the data to your QNAP device, providing an immediate backup.
HDMI Connectivity
One piece that makes the QNAP TS-451+ unique compared to some of its competitors is the inclusion of an HDMI port. Although configuring this feature is a not very intuitive, the ability to connect your NAS device directly to a display is very compelling.

Initial setup consists of installing and configuring HDStation. Now since you're using an HDMI port, you might assume that this is the "high definition station" application, but you'd be wrong. Instead, this is the HybridDesk Station, a fancy term for the platform that runs when the TS-451+ is connected to a TV. From within the tool, you can install various TV-related applications, like Chrome, Facebook, and even LibreOffice. That said, the most important one in my testing was KODI.
After connecting the TS-451+ to the TV and then booting it, you're presented with a start screen and eventually a login. Once authenticated, you can see the list of applications that you installed to HDStation. Navigation is done using the included remote control, but you can also plug in a USB keyboard and mouse if you prefer.
Unfortunately, this is where things didn't work quite as well as I had hoped. I tried loading up MusicStation, VideoStation, and PhotoStation, but all three of them prompted me for a username and password and I wasn't able to use the remote control to input the information. Instead, I had to press the Home button to get back to the main screen.

Loading KODI, however, turned out to be a great experience. From within this tool you can see all of the photos, videos, and music you have stored on the NAS device. It can also point to other locations on your network so that you have a one-stop shop for all of your multimedia. The tool worked great with the remote control and the audio and video quality all sounded great.
I realize QNAP wants to add maximum functionality to their devices, but in my opinion if you connect something to a television, you want a streamlined experience and the TS-451+ didn't provide that outside of KODI.
Personal Cloud
Another feature that all of the major NAS players are now providing is the concept of a personal cloud. Many people don't want to store their data with companies like Apple and Google, but still enjoy being able to access it from anywhere in the world.

QNAP's solution to this problem is MyQNAPCloud. By simply downloading, installing and running CloudLink and ensuring that MyQNAPCloud is up to date on your TS-451+, you are able to go to a specific URL to access any data on your system. QNAP is also offering an SSL certificate for under $50 that allows encryption between your device and your browser, although you might want to look at the EFF's "Let's Encrypt" program as well.
Overall, it's an easy feature to set up and use, provided you aren't concerned with the potential security issues that arise from putting a device on the Internet.
Conclusion
We really should come up with a new name for this class of system, as calling it a simple Network Attached Storage (NAS) isn't telling users the type of power devices like this have. Instead, they're more like full fledged computers that just happen to be able to easily have a lot of disks attached to them and the ability to easily share on the Internet.
That said, as expected, there's a lot to like about the QNAP TS-451+. If you want a no-frills storage box, this device can do that, but you'd be missing out on all of the extra connectivity options you have such as cloud access, streaming music to your desktop, mobile device, or Chromecast, and being able to directly attach and view media on your television.
The TS-451+ even has enough power to run virtual servers (like its younger brother, the TS-451 did), as well as run Docker containers. At only $479 for the 2G version, it's a great way to get a full-fledged device at a reasonable price. For those who need a lot of storage space in their home or who don't want to put confidential data on the Internet, the TS451+ delivers.


21 Comments - Add comment