It happened right in the middle of last month, when a single tweet from a senior Microsoft employee got us excited due to the prospect of what could happen. The tweet simply said "Brewing something exciting next week!!!" with a couple of zipper-mouth emojis, and the possibilities seemed endless. However, since the tweet was by Claton Hendricks who oversees Windows Fundamentals like Task Manager, we were able to pin it down to something related, possibly some new feature.
Hendricks however denied anything of the sort, saying people "assumed" stuff and that the tweet was simply talking about brewing beer with habanero.
Absolutely not, ppl just assumed🤦♂️ It was about brewing beer with habanero 🍺🌶
— Claton Hendricks (@clatonhendricks) October 19, 2022
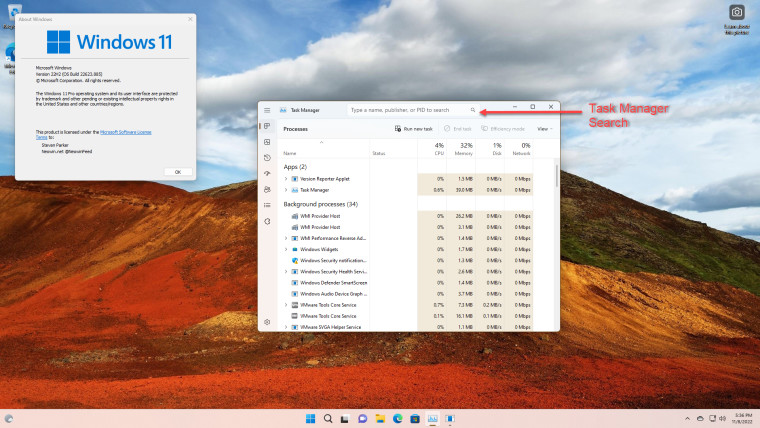
Perhaps to the surprise of no one, though, it does look like Task Manager is indeed getting a new feature. And as one of our Neowin readers wingliston had guessed, it seems a search bar is coming to the Windows 11 Task Manager. This could be something in store for the next Moment 2 feature update, which we had a tiny glimpse of recently.

As one can see in the image above, the new Task Manager shows a search bar on top which will allow users to look up processes and tasks using the name, process ID (PID) as well as the publisher of the process.
This is still a hidden feature inside the Dev Channel preview build, so enabling it can break Windows as there are plenty of experimental work-in-progress features there. Still, if you wish to see the feature for yourself, you can do so by using ViveTool.
How to enable the new Task Manager search in Windows 11 build 25231
- Download ViVeTool from its repository on GitHub and extract the files whenever you like. For example, in the root of drive C.
- Right-click the Start menu button and select Terminal (Admin).
- Switch Terminal to the Command Prompt profile using the arrow-down button on the tab strip.

- Navigate to the folder containing Vive files using the CD command. Here is an example: CD C:\Vive.
- Execute the following command:
- vivetool /enable /id:39420424
- (For PowerShell try: .\vivetool /enable /id:39420424)
- Restart your computer (optional).
To disable the feature, just use "disable" in place of enable.
Update Nov 8: This now also works in Windows 11 builds 22621.885 and 22623.885 released yesterday in the Beta Channel to Windows Insiders.


23 Comments - Add comment