Beelink reached out to me and asked if I was willing to give their AMD variant of Mini PC a whirl, and I was happy to oblige. They sent along the Beelink SER6 Max, which is a pretty cool-sounding name. It has some impressive specs too, which I'll list below.
I have bolded my configuration where relevant.
| BEELINK SER6 MAX 7735HS | ||
|---|---|---|
|
Dimensions |
 |
|
| Size | 4.96x 4.45 x 1.92 inch (126 x 113 x 49mm) | |
|
Weight |
3,03 lbs / 1.37 Kg | |
|
CPU |
AMD Ryzen™ 7 7735HS Base 3.20 GHz boost to 4.75GHz | |
|
Graphics |
Radeon 680M (512MB shared memory) | |
|
Memory |
Dual SO-DIMM 32GB DDR5 @ 4800MHz | |
|
Storage |
M.2 2280 PCIe 4.0 500GB or 1TB SSD | |
|
Operating System |
Windows 11 Pro | |
| Audio | Realtek ALC897 | |
|
Bluetooth |
Bluetooth® v5.2 | |
|
Ethernet |
Intel® I225-V 10/100/1000/2500 Mbps RJ45 Ethernet | |
|
Wireless LAN |
Intel® Wi-Fi 6 AX200 (160MHz) 802.11ax | |
|
Kensington Lock |
No | |
|
Adapter |
Input: AC 100~240V,50/60Hz Output: 19V/5.26A | |
|
|
||
|
I/O Ports |
1 x USB 3.2 port |
|
| Color | Green, Obsidian Black, Orange, Space Grey | |
|
Price |
$629 (MSRP) | |
As you can see above, you can only choose a 512MB or 1TB storage option and one of the four color choices. The rest is the same across the SER6 Max series. The 1TB option is only $20 more expensive as well, which makes it a no-brainer.
The cost is a bit all over the place and depends on where you look. Although (at the time of writing) this is listed at $629 on the Beelink website, you can apply an additional $80 off coupon until Sep 23 bringing it down to $549.
On Amazon, it is listed at $669, and a further $90 coupon can be added bringing it down to $579. If you're a Prime member it's even cheaper at $509 ($599 plus $90 off coupon). So it pays to shop around to see which has the better deal.
The packaging is typical of a mini PC, a square box. However, this one comes with a "sleeve" you must remove first, then you can pull the top off to reveal a "Hello" card, under which is the Beelink SER6 Max wrapped in a "Thank you" message. The Mini PC can be pulled out of the plastimold enclosure with a handy piece of ribbon.
Once the Mini PC holder is removed you can find the instruction manual, cables, and other pieces listed below.
What’s In The Box
- 1 x Beelink SER6 MAX Mini PC
- 1 x Mounteing Bracket
- 2 x HDMI Cables (25cm & 100cm)
- 1 x Magnetic Adapter
- 1 x User Manual
Design
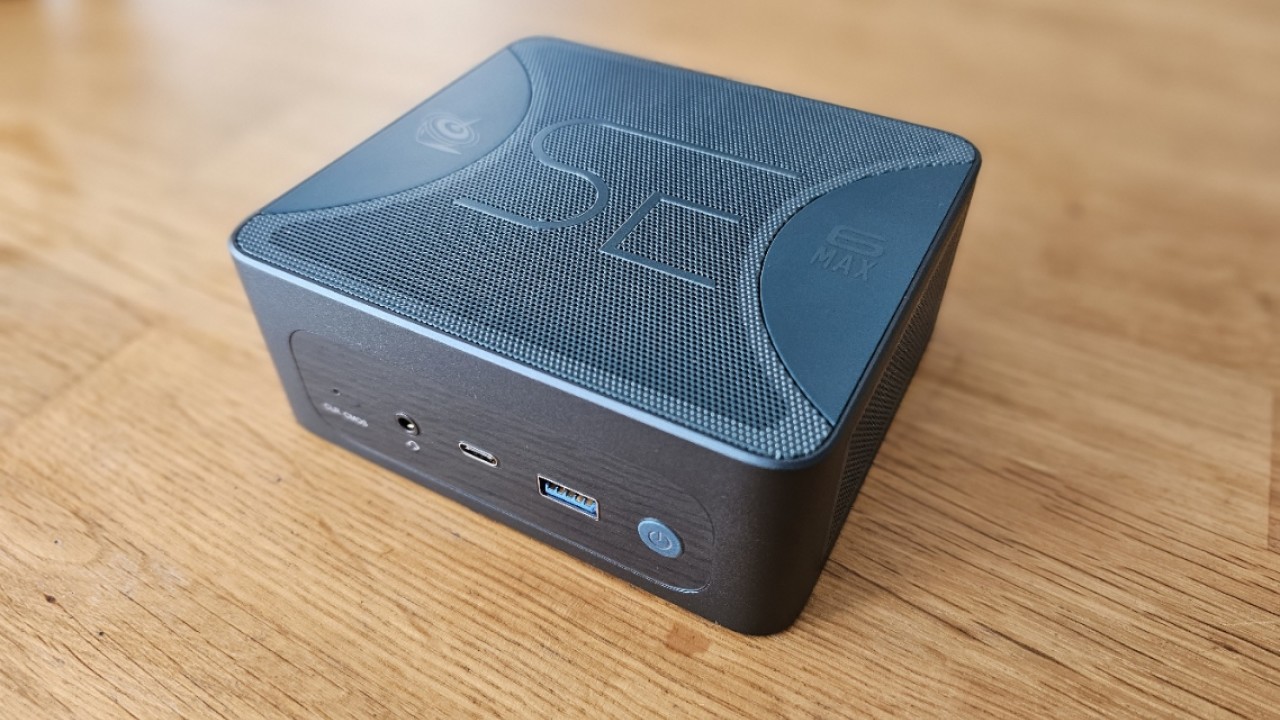
The SER6 Max design is pretty cool. There are hardly any straight edges here, with all corners rounded off. The top grill with what looks like an "S" and a "c" is slightly raised and has the texture of a grill. Under the top cover and letters, there is a hole about 2 inches in diameter which my contact tells me is the air inlet for the fan.
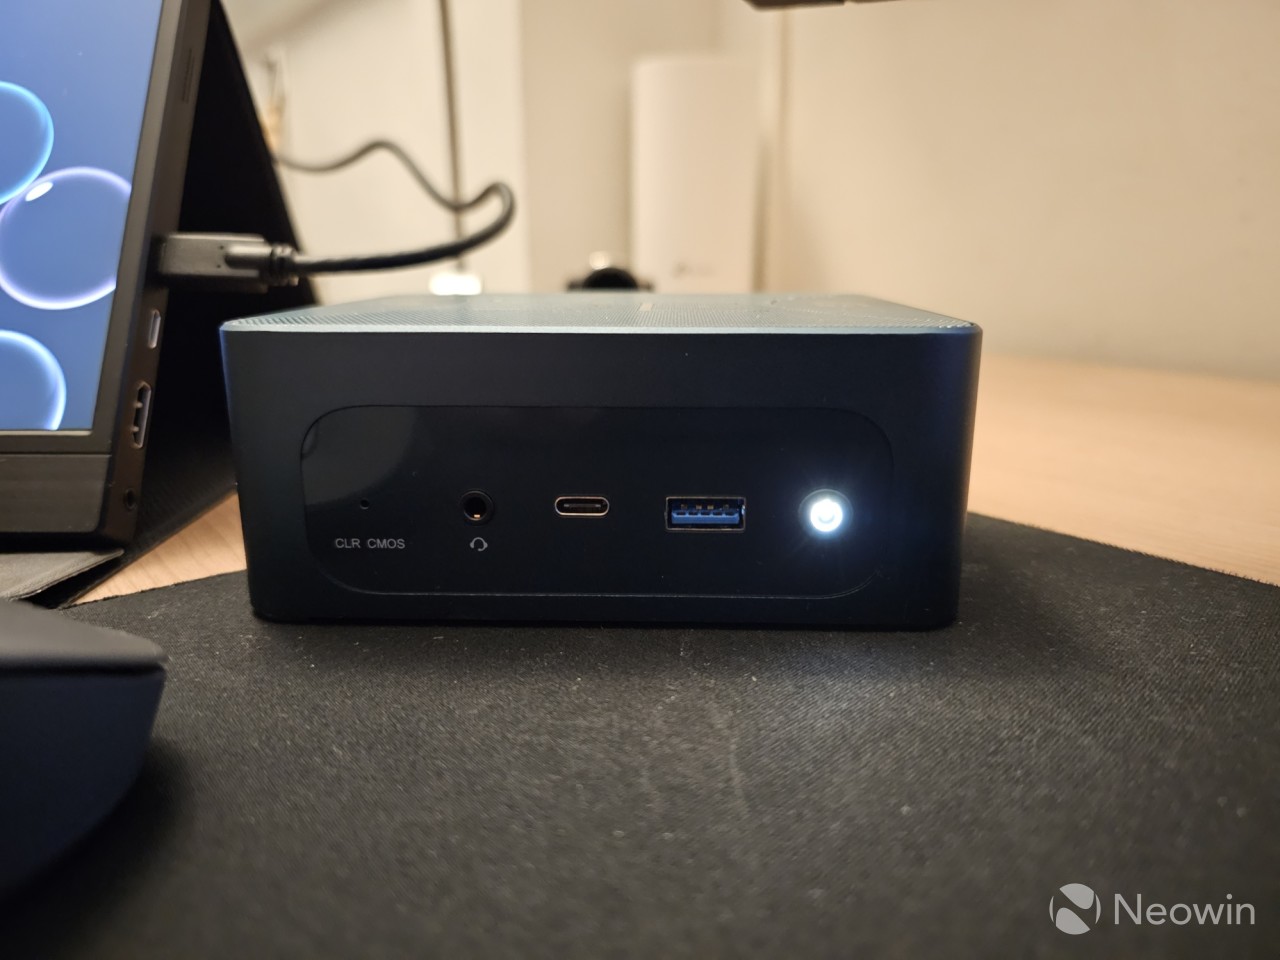
On the front, you have all of the connectivity options you would expect to have; a 3.5mm headphone jack, USB Type C (10 Gbps), and USB 3.2 (Gen 2). However, this means you cannot power a portable display using the front port. Oddly enough there's also a CLR CMOS pinhole. I would have preferred such an option on the back or even on the bottom of the SER6 Max because it's a bit of an eyesore and detracts from the otherwise nice design.
As far as looks go, it is a fully metallic dark green, almost turquoise metal exterior, although, from some of the pictures I've taken, it doesn't quite capture the color well. I managed to take a picture that better captures the color, it's the last picture in the gallery at the bottom of this review or open it here.
It's not a fingerprint magnet. Thanks to the metal frame, it is definitely heavier than some other Mini PCs I've tested that had a mostly plastic construction. This thing is just shy of 1.4kg and certainly has a heft to it.
Accessing the SER6 Max is quite a task. The smallest screws were used here. If you open up the bottom left image in the above grid, you can see all of the screws laid out. Just to make things interesting, they are also different lengths and in one case a different thickness.
I had to reach out to my contact for assistance because there is no instruction on how to remove the fan module in order to access the memory and NVMe. Above, in the last image in red, are the screws that I identified, and the yellow boxes are what my contact showed me. Those screws were quite a way down, just like the bottom right screw that is visible in the above pic, but should not be removed, as that holds the motherboard in place.
So, if you will be purchasing this, do make a note of which screw goes where, and do have a magnetic screwdriver, because, in a couple of places, the screws are far down in the corners.
One very useful thing here is that you can attach a second NVMe SSD right below the bottom metal plate, which avoids you having to take the whole thing apart to access the other NVMe slot and the memory. It's the kind of thing you might only do once, or after a few years, but I wish manufacturers would make it easy, not hard, for customers to do their own upgrades.
Usage
The Good,
On first boot, you are prompted to complete the setup of Windows 11 Pro, meaning you do not have to fork out for a license, which is nice.
After the setup is completed, I am happy to report that the SER6 Max does not come with any bloatware installed. In fact, even AMD Adrenalin and the Realtek Audio console were already installed. It came with Windows 11 22H2, so the updates were pretty minimal.
I have been using the SER6 Max on a portable display, which has allowed me to have it off to the side of my main PC.
It's physically possible to attach four screens to the SER6 Max using the HDMI and DisplayPort, and the two USB4 ports if you wanted. Regarding connectivity, there's the 2.5 GbE RJ45 Ethernet port, two USB 2.0 ports, and another 3.5mm audio jack port along with a magnetic power connector port on the bottom plate. Around the front, there are two USB 3.2 Gen 2 ports and a port for a 3.5mm headphone jack.
the Bad
The magnetic port is a strange one. Initially, I thought, "Oh cool, if you trip over the cable, it will detach just like Magsafe!" Except it doesn't. I can't help feeling it is more like a gimmick, because you have to insert the magnetic connector into the port, just like you would a barrel port, and to detach it, you have to pull it out like you would a barrel port connector

On the website, it does not claim to be anything like Magsafe:
"The magnetic DC connector is on the bottom side of the SER7, making room for more ports on the back."
So I guess that's okay. It is just a strange design decision. The above-unedited quote references the SER7 as well, something we've become accustomed to with Chinese ODMs, getting their specs and naming a bit in a muddle.
There's no SD Card reader or Kensington lock. I do feel like the latter should be included on Mini PCs considering the very nature of them. You have the option of portability and taking it with you to a strange place. Why isn't there an option to secure it as well?
and the Ugly.
I feel like a special mention is needed for the front of the SER6 Max. The CLR CMOS lettering and pinhole are just plain UGLY. And that power light indicator? Wow, it is far too bright and distracting, it is so bright that it actually throws down light onto my black Razer Gigantus mat. I think I was able to capture just what a nuisance it is from the above picture.
These two things really detract from the otherwise wonderful design and build of the SER6 Max, but they are front and center. I guess we could fix the power indicator with a bit of colored tape.
Benchmarks
With that out of the way, and because people like that sort of thing, I ran some benchmarks and compared it to my (now retired) PC which I built in 2019. The SER6 Max is running Windows 11 Professional 22H2 build 22621.2134 and came with Adrenalin Edition v23.5.2 pre-installed, I upgraded to the latest Adrenalin Edition driver which is v23.9.1 (September 2023).
My (now retired) Main PC consists of the following:
- Intel Core i9-9900K (stock)
- Gigabyte Z390 AORUS PRO WIFI (BIOS revision F12)
- 64GB DDR4-3200 G.Skill Ripjaws (16-18-18-38) dual channel
- Samsung 980 1TB NVMe
- KFA2 RTX 2070 SUPER (Nvidia driver 527.37)
- Windows 10 22H2 build 19045.2311
For the benchmarks, I used 3DMark, PCMark 10, Geekbench, and Cinebench. 3DMark Time Spy tests gaming capability with DX12 graphics performance.
PCMark tests are a mix of CPU and real-world productivity tests, such as using an office suite, web browsing, light photo/video editing, and making conference calls. Cinebench stresses the entire CPU as it is a multi-threaded rendering test. Finally, Geekbench is a synthetic benchmark that is great for a quick look at the potential performance across a wide range of workloads.
| Beelink SER6 Max Ryzen 7 7735HS |
GEEKOM AS 6 Ryzen 9 6900HX |
Selfbuild Core i9-9990K |
|
|---|---|---|---|
| 3DMark (Time Spy) | 2,740 | 2,430 | 9,995 |
| PCMark 10 Extended test |
7,048 6,676 |
6,382 6,113 |
6,619 8,853 |
| Geekbench Single Multicore Compute (OpenCL) |
1,600 9,806 32,217 |
1,586 9,326 27,784 |
1,300 8,186 99,450 |
| Cinebench Single Multicore |
1,563 12,846 |
1,671 |
1250 |
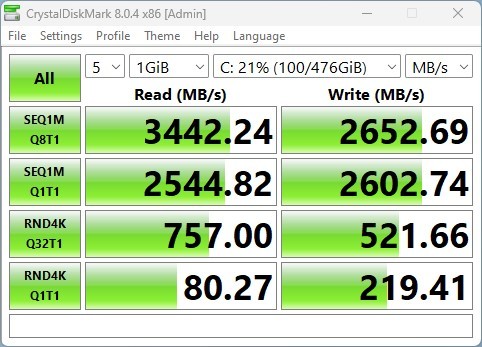
I also tested the SSD's capability using AS SSD and CrystalDiskMark.
| AS SSD | CrystalDiskMark |
|---|---|
Despite running all of the above benchmark tests, the SER6 Max did not even get warm and there were no annoying noises coming from the fan that cools the unit.
Gaming
Beelink markets the SER6 Max as a game-capable Mini PC with snazzy graphics on its page about how CS:Go can get up to 115fps, DOTA up to 116, or PUBG between 71-92fps. Okay, but under what circumstances? And I guess everything is set too low on those games?
In Quake Champions, first released in 2018, everything is set to Low which is the exact same thing you'd expect on a laptop with Mobile-class graphics, so you should definitely keep this in mind when making a decision to purchase a Mini PC. I've logged over 1,500 hours in QC since I started playing it in 2018 and it is tough to play with everything set on low.
Beelink had earlier claimed that it boosts the TDP "up to 65W", but it appears this has been corrected down to a max boost of 54W on its website. But again, what are we boosting for? I feel like manufacturers should get serious about what they are claiming or stop trying to pretend it is something that it isn't.
Conclusion
One thing that remains clear from using these Mini PCs is that they simply aren't a gaming PC. You will not be able to enjoy graphically intensive games on them, but they absolutely are suited as an office workstation, or perhaps a good solution for a student with limited living space with the ability to pack this away after every use. This thing isn't taking up much room. You can even screw it to the back of a screen if it has VESA support with the included mount plate.
In a world that is apparently too stingy for phone manufacturers to include a power lead and charger for their flagship phones, Beelink provides all of the cables and tools necessary to get started straight away, along with a Windows 11 Pro license.
Assuming you've made it this far, at just $629 MSRP, it's still a powerful machine inside a tiny metal body. I am impressed with the build quality, but they shouldn't really be touting this as a gaming PC. A true gaming Mini PC has NVIDIA GeForce RTX 4060 Mobile, or AMD Radeon RX 6600 discrete graphics or better, and this does not. It has integrated onboard graphics utilizing 512MB of shared memory and the CPU.
As I said earlier, you can apply an $80 off coupon on the Beelink website, until Sep 23 bringing its $629 MSRP down to just $549. On Amazon, it is currently listed at $669, and a further $90 coupon can be added bringing it down to $579. If you're a Prime member it's even cheaper at $509 ($599 plus $90 off coupon). So it pays to shop around to see which has the better deal.
As for if I would recommend it, absolutely, but not if you plan on switching out the system's memory or NVMe often. It is a pain (but not impossible) to access the NVMe and memory on the motherboard. However, as I pointed out earlier in this review, there is easy access to the second NVMe slot, which is located just under the bottom plate. It's also not possible to attach a 2.5-inch SSD internally, while a lot of the competition does offer it, so you're stuck with just the option for two internal NVMe's.
Our stories may contain affiliate links for products/apps where Neowin is paid an affiliate fee if you complete a purchase via those links.


3 Comments - Add comment